Activate Your ID
Submit your photo for approval to begin setting up your TigerOne Mobile ID. Once approved, you can add your ID to your mobile wallet and use it to access campus services, dining, events, and secure facilities.


Set up your Mobile ID
Set up your TigerOne Mobile ID using the Transact eAccounts app before arriving on campus, residence hall move-in, or orientation check-in.
Use your Northeast credentials to sign in, submit your photo for approval, and add your Mobile ID to Apple Wallet or Google Wallet once activated.
Have a Question?
TigerOne Card Office
Ramsey Hall Suite 112
Mon–Thu: 8–4 | Fri: 8–12
Email: tigerone@nemcc.edu
Phone: 662.720.7311
Raina Michael
Residential Student Services Associate
Ramsey Hall Suite 112
Email: rjmichael@nemcc.edu
Phone: 662.720.7311
Fax: 662.728.1165
What You'll Need
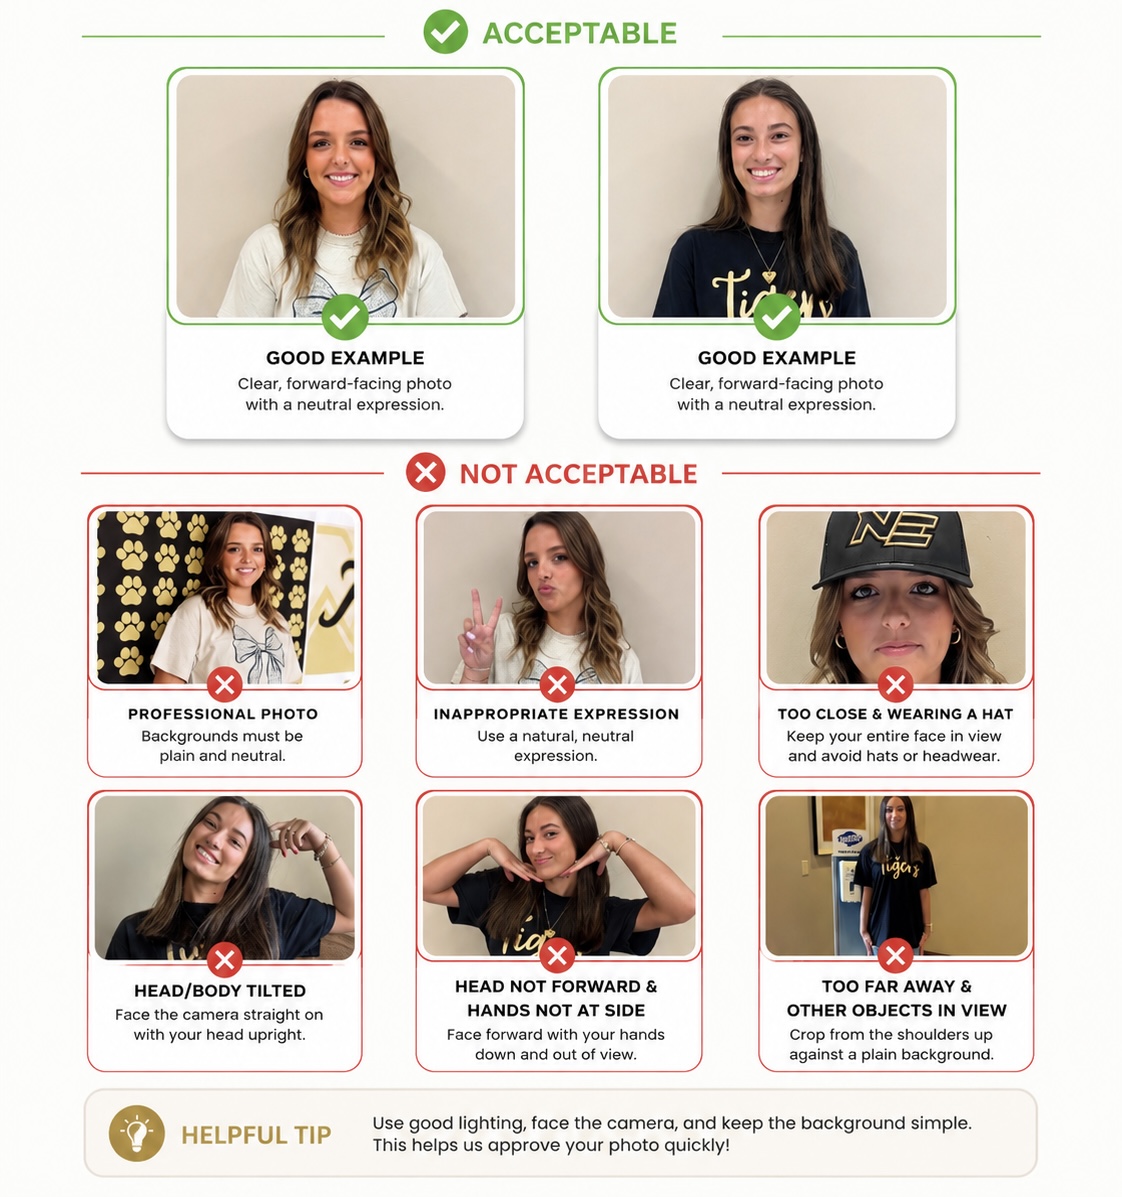
Make sure you have everything ready before submitting your TigerOne photo for approval. Submitting your photo is the first step to activating your TigerOne ID. Once submitted, you will receive an email notification indicating whether your photo has been approved or rejected.
Northeast Login
You must have active Northeast login credentials before submitting your photo.
MFA Enabled
Multi-factor authentication (MFA) must be configured on your account.
Photo Ready
Have a clear, well-lit photo of yourself ready to upload.
Steps to Activate Your ID
Students are encouraged to complete setup before arriving on campus, residence hall move-in, or orientation check-in. Follow these steps to submit your photo, set up your TigerOne Mobile ID, and add your ID to your mobile wallet.
Download eAccounts
Download the Transact eAccounts app from the Apple App Store or Google Play Store.
Sign In with SSO
Open the eAccounts app and sign in using your Northeast Single Sign-On (SSO) credentials.
Submit Your Photo
Upload a clear photo that follows the submission guidelines for review and approval.
Wait for Photo Approval
You’ll receive an email notification once your photo has been approved or if changes are needed.
Add ID to Wallet
Return to the eAccounts app and follow the prompts to add your Mobile ID to Apple Wallet or Google Wallet.
Use Your Mobile ID
Your TigerOne Mobile ID is now ready to use for campus access, dining, events, and services.
Ready to Activate Your Mobile ID?
Download the Transact eAccounts app to submit your photo, manage your account, and add your TigerOne Mobile ID to your Apple Wallet or Google Wallet once approved.
Questions About Your Submission?
Review common questions, photo requirements, and troubleshooting information before submitting your TigerOne ID photo.